Tag Archives: walls

Building a Window Header

A light rain was falling early this morning as Joseph and I drove to the airport.  He will be in New York until the end of the year, and I’ll be joining him there soon.  We left our tiny house behind, parked snug in the barn on the sheep ranch.  We had a lot of sheep-related work in the past few weeks, which probably slowed down our housebuilding.  But it all feels like part of the same life-building.

Yesterday while we were fixing and clearing the electrical wire that runs all around the sheep pastures and protects the sheepies from coyotes, I made up a new phrase, which will be quite useful in ranch life and building life.  We were looking at a little plastic piece which snaps onto a fence post and holds a groove for the electrical wire.  This little piece is perfectly designed to attach to the fence and to hold the wire the right distance, the right height.  It’s “Just Right Tech.”  It’s not high tech; it’s a simple plastic piece.  It’s not low tech; it’s been manufactured to snap onto a fence post in just the right way.  We’re calling it Just Right Tech, and looking forward to opportunities for adding more Just Right Tech to our tiny house.

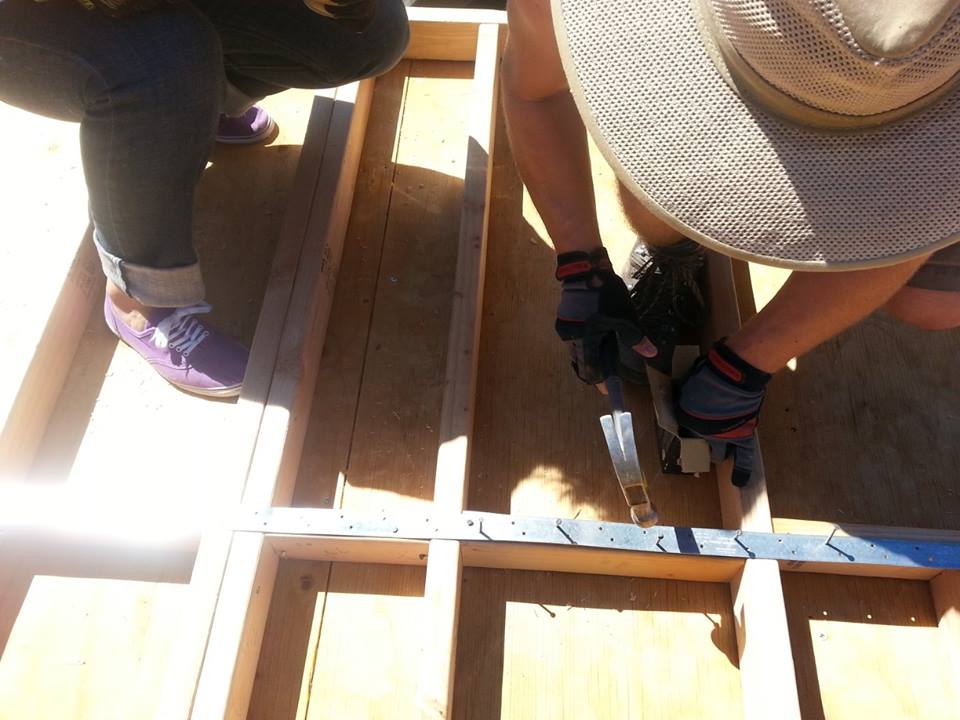
While we are away, we’ll be updating a little less frequently but we do have some build videos all set for you and ready to send out.  Today’s video shows the process of building a header.  The header is the structural piece which distributes the weight of the roof down the studs, rather than that weight resting on your window.  We’ve built a number of headers (for just about each of our windows), and we’ve gotten pretty good at it.  Check out the video for the step-by-step process and Joseph’s explanation of headers.

And if you’re wondering about the photo at the top of the post… yes, we did bring our Lambie over to visit.  Lambs are pretty dirty, so she won’t be able to visit once we’re further along.  But we wanted her lovely lambie-ness to have been inside our home!

Advertisement

Learning to build, then building, then learning to fix our mistakes

by Sarah

So this house-building thing takes a long time.  The house may be tiny… but it still takes a long time!

After reviewing the Tumbleweed DVD this morning, we realized we’d missed a little detail… the sheathing that we’ve put up on the three walls we’ve constructed was supposed to overhang above and below the wall in order to attach to the roof and trailer’s fascia.  We made an overhang below the wall and not above.  It’s probably not that big of a deal.  As in, we won’t have to re-do those walls.  We will figure out a way to fix it, to attach small pieces of sheathing to something, to make it work.

After this little setback, and the ensuing disappointment, I reminded myself that:

1.  It’s got to be about the process and not just the destination.  Because the destination is far away, sometimes it feels very far away.

2.  We are learning how to build.  This is a useful and transferable skill.

3.  We are learning to work together.

4.  We are learning to be humble and to learn a new thing.  How often in our adult lives do we get to learn something totally new, to be complete beginners again?  Not that often.

I hesitated writing this post, because I want this website to be fun, and not to focus too much on the frustrations.  At the same time, frustration is a big part of building a tiny house if you’ve never built a house before.  I want to be honest about this.  It is hard.  It’s not obvious.  There are many little pieces and no clear and simple recipe.  Building is an art, and it’s vast.  We are sloppily finger-painting our ways towards something.  I hope it will be a house that stands straight, resists rains, and keeps us warm.

I did feel encouraged when I ran through those four points, though, reminding myself of all the ways we are learning and growing, even when the external progress on the house appears so slow.

Also encouraging, we’ve had company this week!  Joseph’s brother Adam stayed with us for the past ten days and it was so fun to have another person to build with.  Since we left our Sonoma build site, it’s just been the two of us (and sometimes only Joseph!).  Having Adam here reminded us of how fun and energizing it is to do things with other people!

Here are some photos of our build progress.

Building the latest wall

wpid-20131017_175510.jpg

Adam and Joseph cutting the plywood to fit around the wheel well.
Adam
Adam

wpid-20131024_142709.jpg

wpid-20131024_131310.jpg

wpid-20131024_145316.jpg

We've got three walls!
We’ve got three walls!

Building Update

We sent out a blank post earlier today!  Oops.  Here’s the real thing!

by Joseph

Hello All. We’ve been cooking along on our tiny house, and have received so much encouragement and physical, emotional and cyber-ical help from y’all. Thanks! We figured it was time for an update on the nuts and bolts of the build.

Our second wall is UP!  Building this wall went SO much faster than building our first wall, which is about a third as big.  Meg and Bre, two of our group build compatriots, helped us measure, nail, and everything else to make this wall happen.  We’ve discovered building goes much faster with three or four people than with just us two.  Once we had the wall built, we got even more help.  Five generous, charming, and strong Tumbleweed staffers joined us to lift the wall’s thousand pound mass up and over the welded-on trailer bolts, and then tilt it carefully into place.

Our new wall is a little out of square, but after letting it sit for a few days  it went from one-and-a-half inches out down to three quarters of an inch out… and we think (hope!) once we start strapping and bolting things down it’ll get even more level/plumb.

Here are some pictures of our progress.

Base Plates in place and pre-drilled
base plates in place and pre-drilled
a header for the window
Sarah measuring and placing things for a dry run.
Meg Measuring
Meg measuring
Measuring X 2
Measuring X 2
tissues = KEY! ;-)
tissues = KEY!
Joseph and Bre hammering the coil strap
mas coil strap
more coil strap
The Tumbleweed staff took a break from the office to lift the wall into place
I have no idea how we would have done it without them!
plywood overhand
plywood overhang to connect the walls

Team Purple (Bre and Joe) are working on their shou-sugi-ban siding while they wait for their SIPS to be delivered; it is beautiful! Shou-sugi-ban is a traditional Japanese wood treatment.  They torch the wood, then sand/wipe it, then treat it. We’ve included some pics here and we’ll definitely share more as they progress.

wpid-20130908_121656.jpg wpid-20130908_121649.jpg wpid-20130908_121527.jpg

Meg is making a beautiful butcher block for her interior counter tops using multi-colored strips of hardwood. Here’s a video we took while deciding on butcher block design (also more of this to come).

We also met with Meg to hammer out a new vision for the interior of our house.  This made the whole thing feel very real all of a sudden.  This actually took a few hours, as we walked around on our two-walled trailer platform and visualized various things, drew in our sink and oven and thought thoroughly about who we are and what’s important to us in a space. We asked questions like: How do you enter a space?  What’s the first thing you do? the second?  How do we want to use the space? Cooking, computer work, yoga, dinner parties, getting dressed, bathing, watching movies, reading, day-dreaming, cuddling (Sarah wrote that last one, I swear).

Also, we’ve been thinking about who each of us are and what we each need. Por ejemplo: Sarah needs private place to write. Joseph wants be able to be an introvert, even within a shared small space.  And, we like sitting around the table together. All of this process was really helpful to start thinking about. Sarah and I were just so focused on how to frame a house, that we started letting the inner details fade. Here’s a picture of the sketch Meg made for our interior, though we feel this will be it’s own post when we get a bit closer.

Interior first floor design